UNI-GRx First Time Set-Up
First-time setup
You have just received your brand-new UNI-GRx! Congratulations. Setting up your receiver by yourself might seem challenging, but it is not. We gladly offer you a helping hand. We do that with this First-time setup web page, and with our ‘How do I set-up the UNI-GRx for the first time?‘ article.
See our knowledge base for more questions and answers.
Start from scratch, the icons
Besides reading our ‘ How do I set-up the UNI-GRx for the first time?‘ article, knowing what every icon in UNI-Connect represents, will help you tremendously. You’ll memorize the steps and improve on speed, repeat settings for a new point, or quickly check for a fix. As you see in the picture below, we have numbered each icon in UNI-Connect. Scroll a bit down to see what they represent.
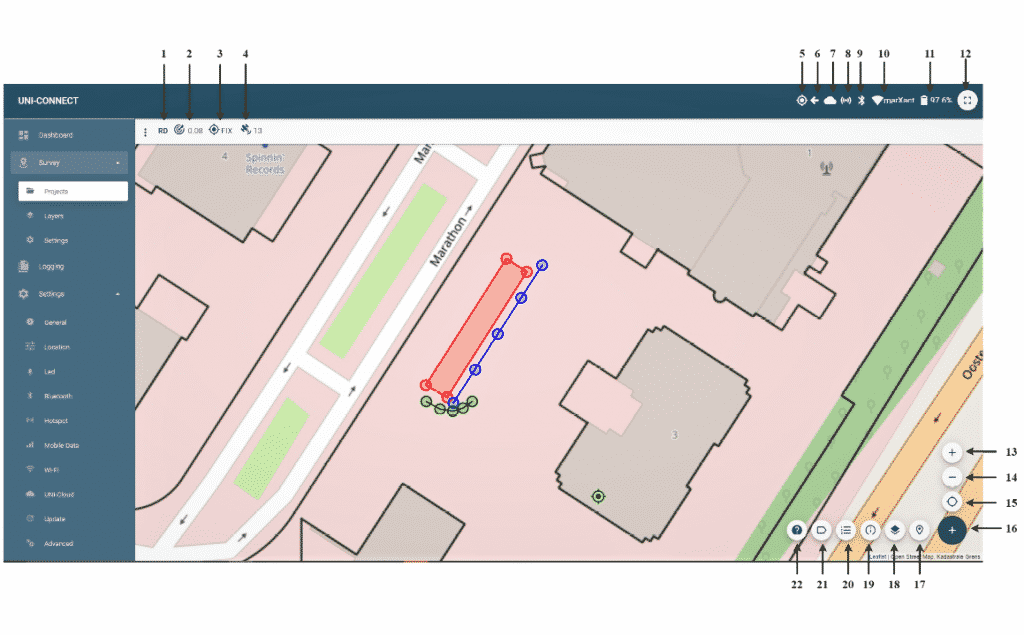
- This is the name of your project.
- This icon represents the accuracy you currently have in meters (0.08 is 8 centimetres).
- Indicates whether you have a fix, float or single.
- The number 13 in the picture means how many satellites are giving signals to your UNI.
- Another indicator if you have a fix. As long as there is a dot in the middle, you have a fix.
- Indicates that you receive RTK correction data.
- The cloud icon proves you are connected to UNI-Cloud.
- Icon 8 shows if you are connected to a hotspot or not.
- You are connected to Bluetooth.
- This icon shows you what Wi-Fi (or hotspot) network you currently are using.
- The percentage of battery you have left.
- Fullscreen mode.
- Allows you to zoom in for more details.
- Allows you to zoom out for a better overview.
- Centering position on the map.
- Survey a new point.
- Different geometric types to record.
- Layers used in the project.
- Info project panel.
- List of objects.
- To turn labels on and off.
- The icon for Help.

A. By clicking this option, you see B-E appear.
B: Allows for you to create a single point.
C: Allows for you to create a point in a polyline.
D: Allows for you to create a point in a polygon.
E: Allows for you to create a virtual point(offset point).
Video surveying guide:
Tommy takes you by the hand and guides you step-by-step through the set-up and surveying process.