How to Import into the UNI-Cloud
Importing lets you bring an existing data file into UNI-Cloud, so you can view and work with it alongside your project.
If it's your first time importing, this guide will walk you through each step. If you get stuck at any point, our Support team is happy to help.
Before you import: check your drawing
Not every file can be imported as-is. Before you start, make sure your drawing meets the following requirements:
Your drawing must use real-world coordinates
The data needs to be positioned on a real location on Earth, using a Coordinate Reference System (CRS) - this is a standardised framework that defines exactly where something is on the globe.
There are many different coordinate reference systems in use around the world, so it's important that the CRS of your file matches the one set for your project in UNI-Cloud. Without a matching CRS, the system has no way of knowing where to place your drawing on the map.
Distances also need to be in metres. If your drawing was made without a real location in mind - for example, with arbitrary coordinates starting at 0,0 - it cannot be imported.
If you're unsure which CRS your file uses, check with whoever created it, or contact our Support team.
Only certain elements will be imported
UNI-Cloud supports points, lines, and polygons. If your file contains other element types, here's what happens to them automatically:
- Circles - converted to a point at the centre of the circle
- Block references - converted to a point at the centre of the object
- Arcs - segmented into a polyline (this is handled automatically and explained in the interface)
Your file must be a supported format
| Valid file types | File extension |
Available for all Tenants? |
| DXF | .dxf |
✅ |
| DWG | .dwg |
✅ |
| Comma-separated values | .csv |
✅ |
| LandXML | .xml |
✅ |
| Keyhole Markup Language | .KML |
❌ |
| Autocad compiled shapefile ZIP folder | .shx |
❌ |
| KLIC-melding (Netherlands) |
|
❌ |
| Manual points |
|
✅ |
Importing in the UNI-Cloud
Where can I import?
There are two places where you can import files into the UNI-Cloud.
- The UNI-Cloud (Desktop)
- The UNI-Collect app (Mobile App)
This guide will primarily focus on the import via the UNI-Cloud as we recommend any file changes to be made here. The UNI-Collect app uses the same import flow, but it is optimized for mobile use.
Where can I find the import functionality?
To import a file into the UNI-cloud, you will make use of the import window. There are two places where you can find the import window: During project creation or within your existing project.
Navigating to the project page
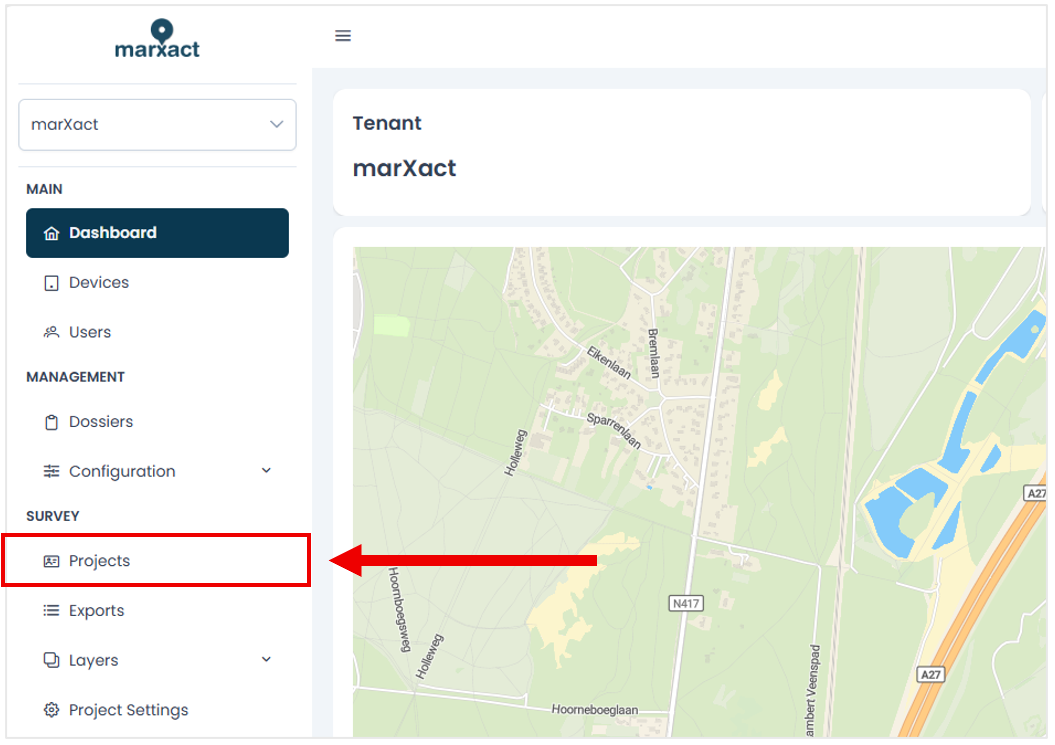
First step to finding the import window from the dashboard. You will need to navigate to the project page via “Projects” In the sidebar.
Importing during project creation
A file can only be imported into a project. If you don’t have a project yet you can create one. The good thing is that we have a quick import feature where we can create a new project and import your file at the same time. Select “Import” in the top right corner and this will open the file import window.

Importing within an existing project
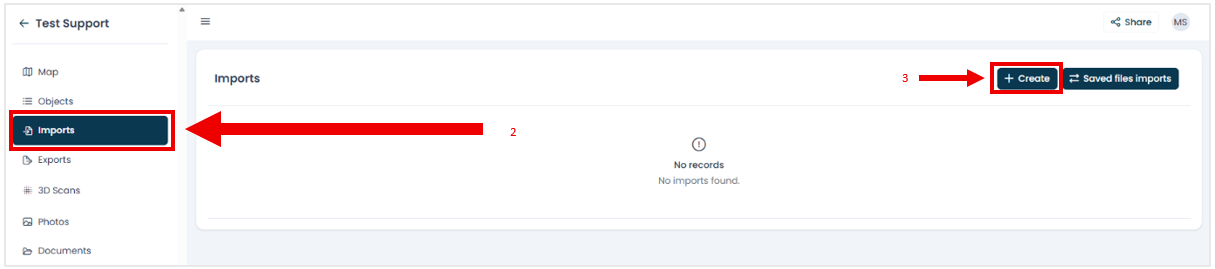
If you already have a project, you can open your project via the project overview page by selecting the eye icon to the right of your project. Within your project you can select the “Imports” tab from your sidebar to navigate to the list of your imports. On the top right of your imports page you can select “+Create” to open the file import window.

The Import Window
The Import Window: File Type
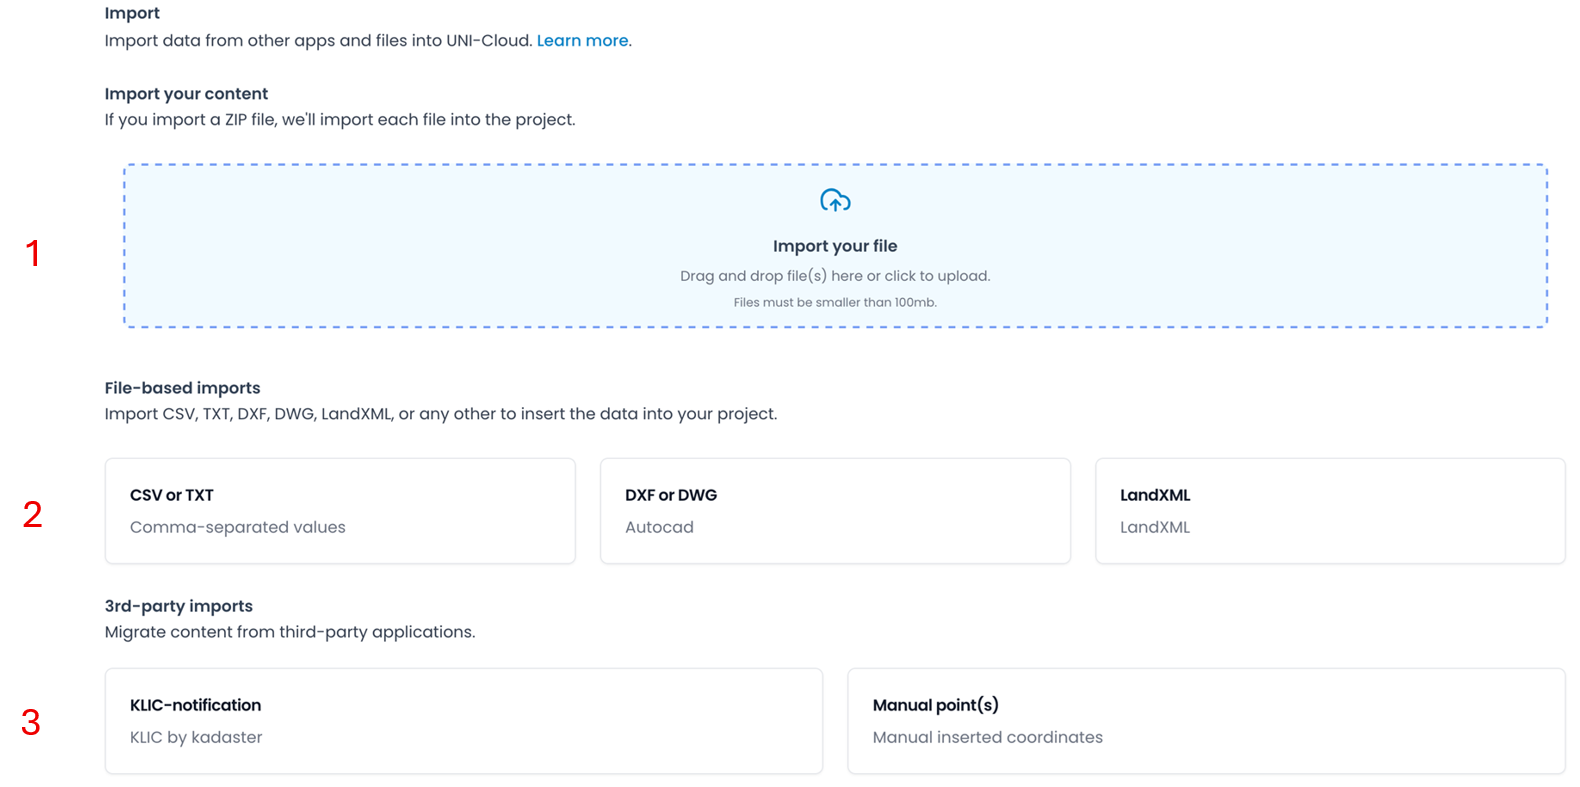
Now that you have your import window open either from the project page or from the import page within your project, you can start the data import process. The first tab you see will be the “File Type” tab. There are three ways you can import your data. Dragging, file-based, and 3rd-party imports. Dragging and file-based both allow the same file types and whichever you choose it will all come down to the same steps afterwards. The main difference is that dragging also allows for ZIP files.
1) Importing by dragging
You can import your files by dragging the file onto the blue import space, if it is a valid file type it will be recognized automatically. Clicking on the import space will open your explorer where you can manually select the file you want to import.
Importing multiple data files via a ZIP folder
Sometimes you want to import multiple data files, this can also be done via the blue import space. By dragging the ZIP folder onto the blue import space, it will automatically read all relevant data files.
Import Restrictions
Keep in mind that there are several restrictions to importing a file. These being that the file needs to be one of the valid file types with a max file size of 100MB, and the XYZ coordinates need to be within the CRS of the project.
For the ZIP file with multiple files there are additional restrictions. First, the entire ZIP file can only be max 100mb. Second, all the files need to be of the same valid file type, like .dxf, .dwg, or .xml. Also if the files you want to import are csv. files, then they all need to have the same headers.
The import window will notify you if your file does not comply.
2) Import by specific file type
Another way to select the file you want to import is by clicking on the specific file type buttons. These will open the file explorer and only show the files with the specific file type. This can be very useful if you have large file folders with multiple file types.
3) Importing data from external sources
KLIC data
If you operate from the Netherlands, you may work with KLIC data. Via the “KLIC-notification” button you can import KLIC data using the relevant KLIC url and if needed the KLIC-notification access code.
Manual points
When you have a set of coordinates you want to insert manually, you can do so by pressing the “Manual point(s)” button. In the following window you can insert your coordinates.
In the layer column you can select which layer the manual point should be added to. In the “X” and “Y” column you can insert the X and Y coordinate respectively. Optionally you can also give the manual coordinate a name in the “Name” column and a height coordinate in the “Z” column. If you want to insert another point, press the “+ Create” button in the bottom row of the table. This will add another row where you can insert a manual point. If you want to remove a row you can press the red icon next to the respective row.

The Import Window: Upload
After selecting a file, you get taken to the Upload tab. Here you can check if you selected the correct file, if not you can press the red X and press the “Choose file” button to manually select a new file with the same file type. If you want to choose another file type you will need to go back to the “File type” tab by clicking on it in the top left of the import window.
The Import Window: Columns (.csv file only)
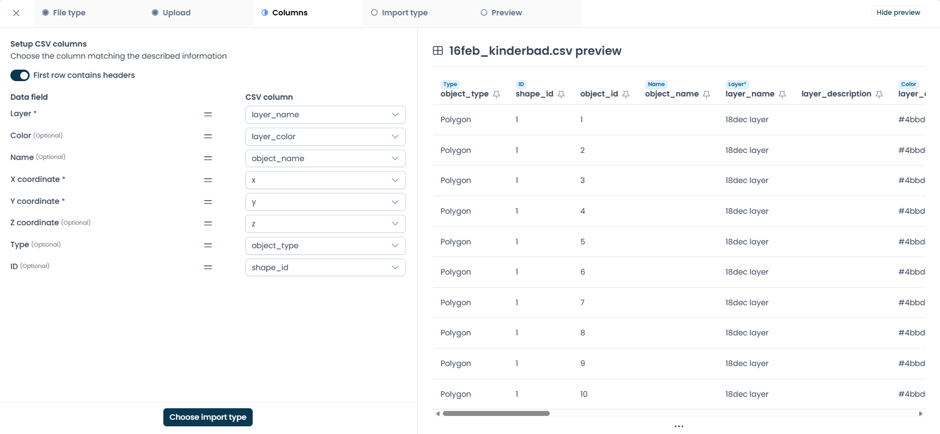
If you want to import a .csv file a unique tab will appear, the “Columns” tab. This is a very useful tab as it allows you to define which columns contain relevant data. In most cases this is done automatically, but you can also adjust it manually yourself. On the left you can assign per data field its respective column by using the dropdown menus, which show the columns in the .csv file. On the right you can see a preview of your .csv file to make it easier to assign the relevant columns.
The Import Window: Import Type
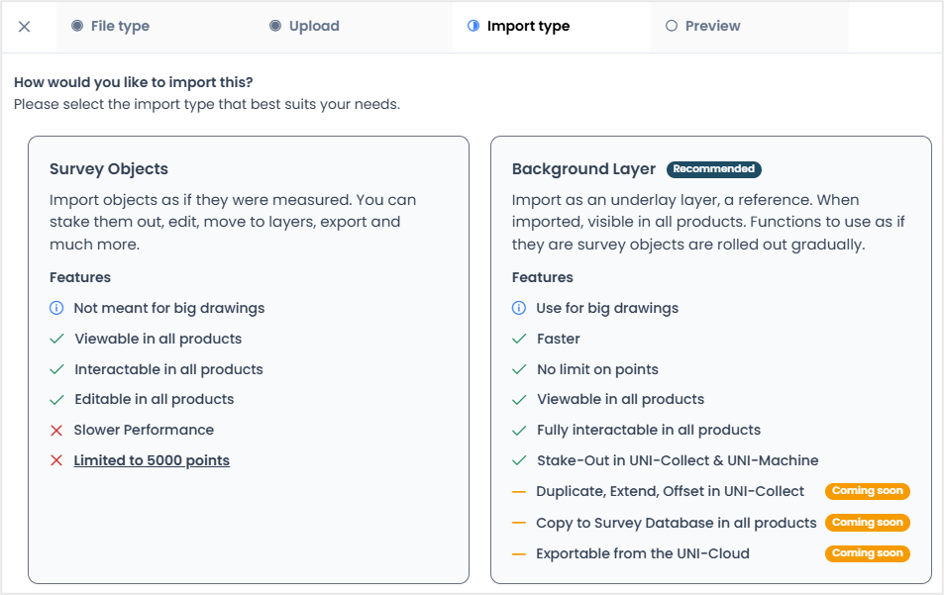
In the “import type” tab you can choose how the data will be imported. In short, there are two options:
- Survey Objects - elements that are fully interactable
- Background Layer - partially interactable but significantly faster to import
It is recommended that you use the Background Layer as this is a faster way to import, especially when it comes to larger projects. Choose Survey Objects only if you want to interact with the objects in your data, like editing specific points.
The Import Window: Preview
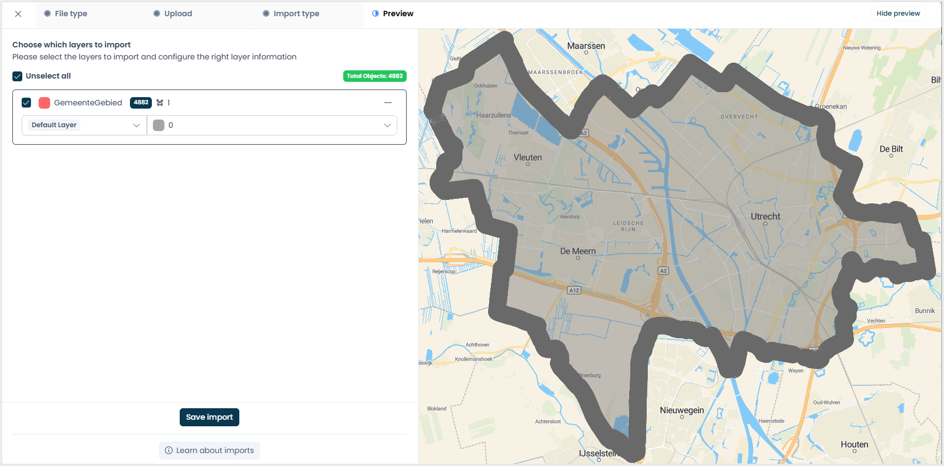
On this page you can see a very practical preview of how the file will be displayed in the system. Here you can assign layers, which layers to import, and start the actual import of the file(s) into the UNI-Cloud.
Selecting and assigning the layers for import
Within UNI-Cloud, every element (like points, lines, and polygons) always has a layer assigned. Any file you import either has no layers specified or already has layers specified (such as layers from a DWG or DXF file, or a layer column name in a .csv). If you have previously customized layers in your account, then these will be available during assignment.
You have two options for assigning a layer upon import:
- Assign a layer from your file to an existing custom layer in UNI-Cloud
- Create a new layer with the name carried over directly from the file
You can select which layers to import by via the checkbox next to the layer’s name. You can also assign each layer to a new or existing layer. In the case of assigning to an existing layer, you can do that via the drop-down menu on the bottom right of each layer. When a layer is automatically assigned as an existing layer, then the layer already exists in your UNI-Cloud environment.
When the preview seems in order you can press the “Save Import” button to start the import process.
The Import Window: Loading Screen
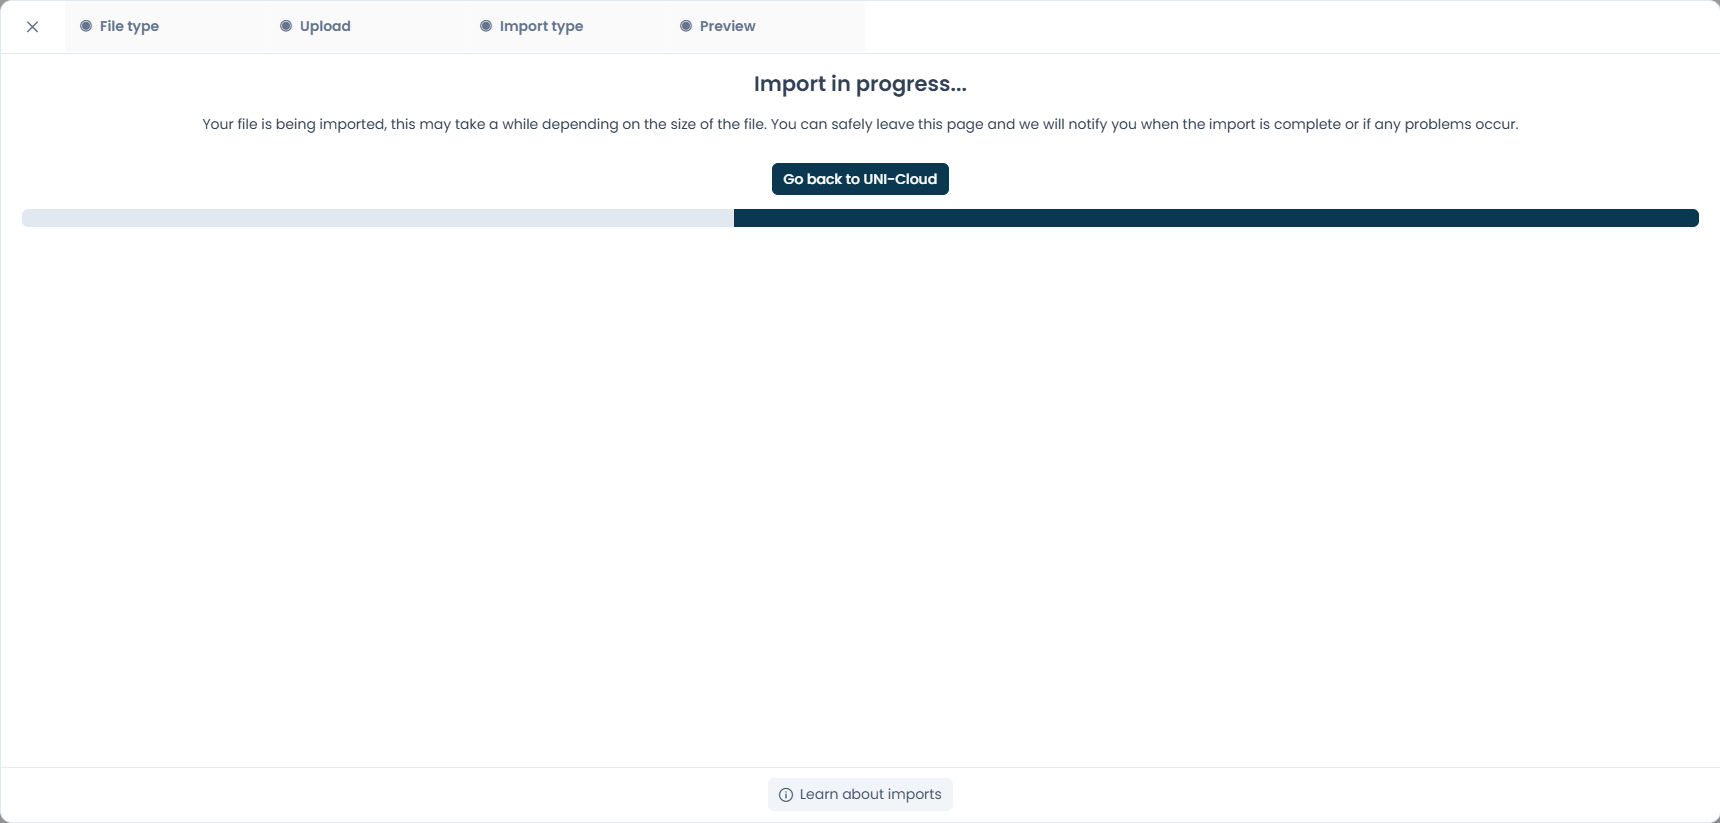
The last window shows the loading screen. This is when your data is actually being imported into the system. When you see the loading bar, don't close the page yourself. Wait for it to close automatically, so the import can finish properly. After the import has completed the page will refresh itself and you'll see the data you have imported among your imports within the project.